Introduction
Hardwood floorings are synonymous with beauty, heat, and durability. They can raise the visual of any space, making it feel much more welcoming and innovative. Nonetheless, setting up hardwood floor covering is not a simple task; it requires proficiency, accuracy, and the right tools. In this extensive overview, we explore Innovative Devices and Strategies for Efficient Hardwood Floor Installation that can transform a labor-intensive process into a seamless experience. From innovative tools to time-saving approaches, this post will equip you with all you require to understand about attaining that ideal wood floor.
Understanding Hardwood Flooring Installation
What is Wood Floor Installation?
At its core, wood floor setup involves positioning wooden slabs onto an existing structure-- whether it's a concrete piece https://pastelink.net/ydodhte7 or an old floor covering system. The process can differ significantly depending upon elements like the sort of wood made use of, the subfloor condition, and the chosen installation technique (nail-down, glue-down, drifting).
Types of Hardwood Flooring
- Solid Hardwood: Made from a single piece of wood; very resilient however conscious adjustments in humidity. Engineered Hardwood: Made up of several layers; more secure than strong wood. Reclaimed Wood: Sourced from older buildings; eco-friendly however may need refinishing.
Preparation for Installation
Before diving right into setup, ensure your work area is prepared:
Acclimation of Wood: Permit your hardwood planks to adapt in the space where they'll be mounted for at the very least 48 hours. Subfloor Assessment: Check for moisture degrees and monotony. You want a tidy slate! Tools Checklist: Collect important devices such as saws, nail guns, and moisture meters.Innovative Tools for Reliable Wood Flooring Installation
Advanced Trimming Tools
Table Saws vs. Miter Saws
Using advanced cutting tools like table saws and miter saws can substantially enhance efficiency.
- Table Saw: Offers precision cuts for long planks. Miter Saw: Perfect for angled cuts at corners.
Why Usage These Tools?
These saws permit cleaner cuts and decrease waste by making sure accuracy in measurements.
Nail Guns
Pneumatic Nail Guns vs. Battery-operated Toenail Guns
Nail weapons have actually reinvented hardwood flooring installment:
- Pneumatic Toenail Guns: Need an air compressor yet offer constant power. Battery-operated Toenail Guns: Offer mobility without needing an air source.
Impact on Efficiency
With nail weapons, you can save time compared to by hand nailing each plank while maintaining high-quality results.
Moisture Meters
Moisture meters are vital before starting any hardwood flooring installation task:
- Ensure your subfloor isn't as well wet or dry-- ideal wetness degrees drop in between 6% to 9%.
Flooring Jack
A floor covering jack aids align slabs perfectly throughout installment:
- This device is particularly valuable for limited rooms where hands-on adjustments are challenging.
Techniques to Enhance Efficiency
Pre-installation Planning
Layout Design
Prior preparation on exactly how your boards will be outlined can save you time:
Decide on the instructions based upon light sources. Make sure to stagger joints; this adds stability.Using Spacers
Employ spacers in between planks during installation:
- This enables growth gaps that protect against bending in the future as a result of temperature changes.
Floating Floors Technique
This approach does not require glue or nails:
Lay down an underlayment first. Simply click the boards with each other-- the simplicity alone makes it popular!Post-installation Techniques
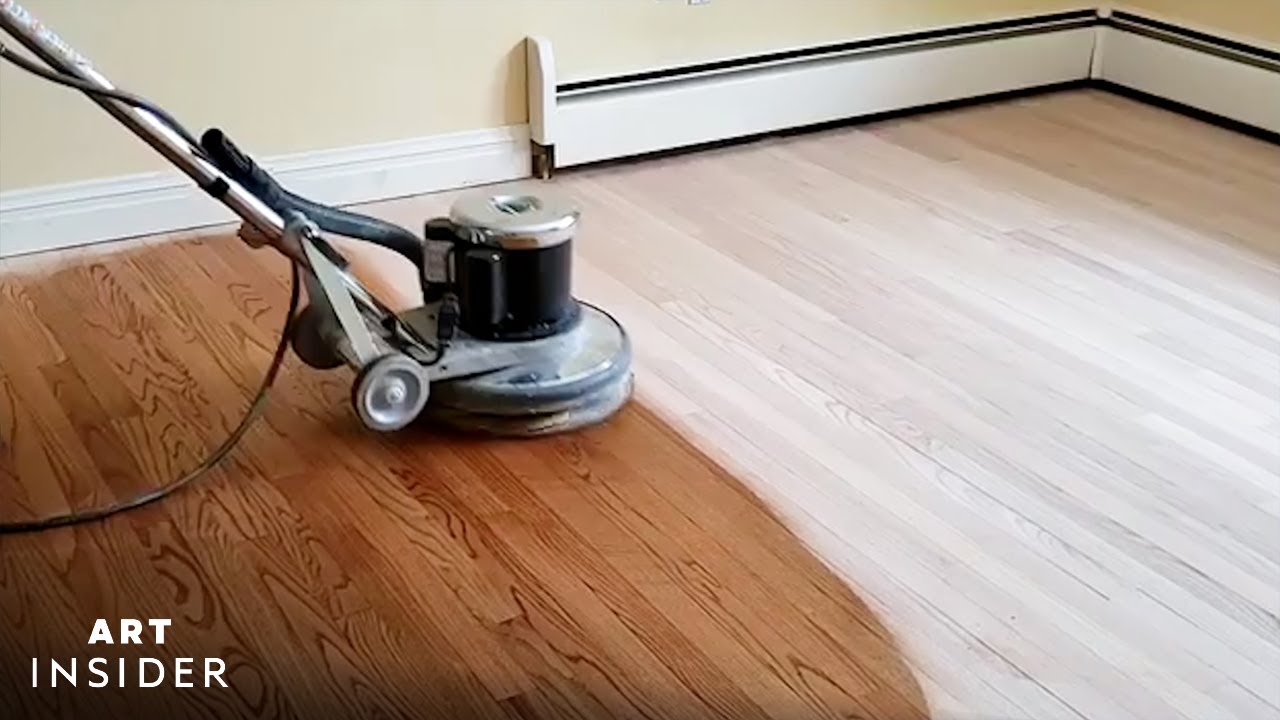
Hardwood Flooring Refinish
Once installed, take into consideration refinishing your brand-new hardwood floors after several years:
- This procedure brings back the original radiance without needing complete replacement.
Benefits of Refinishing
Increases longevity. Enhances appearances by eliminating scratches and dullness.FAQ Section
1. The length of time does hardwood floor installment take?
The duration relies on the location dimension and intricacy however typically varies from someday to a week.
2. Can I set up hardwood floors myself?
Yes! With the right devices and strategies outlined below, DIY installments are totally feasible!
3. What types of coatings are available after refinishing?
Common surfaces include oil-based polyurethane and water-based alternatives; each has its advantages and disadvantages relating to sturdiness and drying out time.
4. Need to I employ specialists or do it myself?
If you're confident in your skills or have previous experience with woodworking-- also better! If not, specialists ensure top quality results.
5. Is upkeep needed after installation?
Regular cleansing with ideal products will maintain your floors looking beautiful; stay clear of water damage in all costs!

6. What's the most effective method to cleanse my newly installed wood floors?
Use a microfiber wipe along with specialized cleaners developed particularly for wood surfaces!
Conclusion
In summary, successful wood floor setup rests on understanding both innovative devices and reliable techniques customized to boost effectiveness throughout the entire process-- from preparation with ending up touches like redecorating when required. As you embark on your following floor covering project equipped with this expertise-- and maybe even some new gizmos-- you'll find that not just will you attain spectacular outcomes yet also delight in every step along the way!

By leveraging these understandings into innovative devices and strategies for effective wood flooring setup, you're well on your way to developing beautiful spaces that stand the examination of time! Whether you're laying down new floorings or preparing a redecorate down the line-- get ready to craft something genuinely special!